显示标签为“高频”的博文。显示所有博文

2024年3月28日星期四

OpenResty/Nginx设置TCP/UDP端口转发

TCP/UDP端口转发配置示例:
~/nginx.conf文件末尾添加配置代码:


stream {
include /etc/nginx/conf.d/*.stream;
}


stream {
include /usr/local/openresty/nginx/conf/conf.d/*.stream;
}

conf.d目录下,添加*.stream后缀的配置文件,并编辑配置:

tcp.stream 文件:
#同时监听ipv4及ipv6的88端口并转发到本地localhost的80端口
server {
listen 88;
listen [::]:88;
proxy_connect_timeout 5s;
proxy_timeout 20s;
proxy_pass localhost:80;
}
#将udp 53端口转发到192.168.1.23 53端口
server {
listen 88 udp reuseport;
listen [::]:88 udp reuseport;
proxy_timeout 20s;
proxy_pass localhost:80;
}


2022年10月5日星期三

armbian 系统使用备注

更新
系统更新
sudo apt-get update  -y && sudo apt-get upgrade  -y && sudo apt-get dist-upgrade -y
垃圾清理
sudo apt-get autoclean && sudo apt-get clean && sudo apt-get autoremove && history -c && dpkg -l |grep "^rc"|awk '{print $2}' |xargs aptitude -y purge

Debian系统源:
Ubuntu系统源:
armbian源:

电源安全关闭
poweroff

启用硬件随机数生成器(HWRNG)服务(提升熵值,提升部分服务初始化速度)
sudo systemctl enable --now rng-tools-debian

内核更新
armbian-update
更新脚本路径:
/usr/sbin/armbian-update

设定指定目录读写权限
chmod -R 777 /mnt

删除文件(rm -rf / 绝对不要执行!会清空系统根目录)
删除目录
rm -rf   目录名
删除文件
rm -f   路径

软连接目录
#建立软链接  /mnt/Data/.halo(真实目录)与 /root/.halo (将要软连接的目录)
ln -s /mnt/Data/.halo /root/.halo

安装dkms组件
sudo apt install dkms

Systemd服务控制:
# 刷新 Systemd
sudo systemctl daemon-reload
#命令+服务名
# 开机自启
sudo systemctl enable 
# 启动
sudo systemctl start 
# 重启
sudo systemctl restart  
# 停止
sudo systemctl stop 
# 查看运行状态
sudo systemctl status 
# 禁用服务(取消开机自启)
sudo systemctl disable  
# 查看服务是否启用
systemctl is-enabled  

终端使用proxychains4加速网络:
sudo apt install proxychains4
终端内使用:
proxychains bash

#screen简单使用:
创建后台窗口,本次以update为窗口名字演示
screen -S update
#恢复后台窗口
screen -r update
#结束后台窗口
screen -S update -X quit

多个同名的screen会话,可以执行:screen -ls 查看对应会话的session_id,然后使用screen -D -r + session_id 进行恢复。
screen -D -r session_id
退出指定会话 screen -X -S + session id quit
screen -X -S session_id quit

远程执行脚本改本地执行:
示例:
远程命令:
wget -qO- https://raw.githubusercontent.com/komari-monitor/komari-agent/refs/heads/main./install.sh | sudo bash -s -- -e https://ss.cn:58282 -t ISxUoeCAdd653xTmU6Jscf
改本地执行:
sudo bash install.sh -e https://ss.cn:58282 -t ISxUoeCAdd653xTmU6Jscf


#查看磁盘分区情况
lsblk

df -lhT

内置分区挂载:
示例:
挂载boot分区:
mount /dev/mmcblk2p1 /mnt
挂载系统分区:
mount /dev/mmcblk2p2 /media
-挂载命令    -待挂载分区    -将要挂载到的目录(实际存在)
分区卸载
umount /dev/sdb1
-卸载命令    -将要卸载的目录

自动挂载SD卡:
rc.local 文件内添加命令
sleep 3
mount /dev/mmcblk1p1 /mnt/Data
exit 0


开机自动挂载指定硬盘
查看磁盘信息
blkid

格式化命令如下:
mkfs.ext4 /dev/sda(换成自己的硬盘名)
或格式化成ntfs格式
mkfs.ntfs /dev/sda(换成自己的硬盘名)
首先介绍一下手动挂载和卸载硬盘,
比如把你的硬盘挂载到/mnt/disk
如果没有这个目录,你需要先创建目录,执行 mkdir -p /mnt/disk  (/mnt/disk是你想要创建的目录路径).
mount /dev/sda1 /mnt/disk/
mount UUID="14DC0E4ADC0E2698" /mnt/disk/
上面的UUID是对应于/dev/sda1的,两种方式都可以挂载。
挂载完成后,cd到/mnt/disk/目录,然后执行ls,就可以看到挂载的硬盘里的内容了

卸载执行下面的命令就行

umount dev/sda1(设备名)
umount /mnt/disk(挂载目录)
以上代码只是示例,需要换成对应的名称和挂载目录

下面是自动挂载

思路一 通过修改fstab挂载(不推荐)

不推荐这种方法,一旦你的硬盘拔下来了,然后在开机之前没装上,你的系统基本就废了,进不去系统,需要重刷,不适用于可能经常插拔的移动硬盘。

执行如下命令:

nano /etc/fstab

在打开的窗口下面空白处输入以下代码

UUID="14DC0E4ADC0E2698" /mnt/disk ntfs auto 0 0

以上代码的含义分别是:你硬盘的UUID(通过blkid命令获取)、想要挂载到的目录(要提前建好目录)、你硬盘的文件系统(ext4或ntfs),后面的auto 0 0照抄就行,要注意这几个参数之间都是有一个空格的。编辑好之后,Ctrl+X退出,Y保存,回车确认,这样就设置好了开机自动挂载硬盘。

思路二 通过rc.local(推荐)

这种方法的好处是,你即使拔下来硬盘开机,也不会进不去系统,等你下次插上硬盘开机还是会自动挂载,非常方便!

依次执行如下操作:

nano /etc/init.d/mount.sh

输入以下内容

#! /bin/sh
# sleep 1
mount UUID="14DC0E4ADC0E2698" /mnt/disk/

记得把你自己硬盘的UUID和你要挂载的目录替换上去,保存退出。然后执行下面的命令:

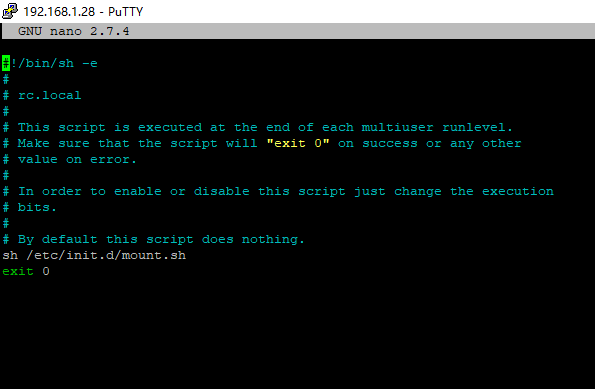
nano /etc/rc.local

会输出一个内容,在exit0之前添加下面的代码:

sh /etc/init.d/mount.sh

添加后效果如下图所示
a92WLT.png

然后保存退出即可,这样开机自动挂载硬盘就搞定了,这种方法比较安全,推荐使用。


设置LAN+Wlan同时在线:


1-删除旧的 netplan 生成的 WiFi(如有必删,无则跳过):

nmcli con delete "netplan-wlan0-YH-5G"

2-添加WIFI:(示例-SSID:YH-5G 密码为:12345678   无线模式为:隐藏)

nmcli connection add type wifi \

ifname wlan0 \

con-name YH-5G \

ssid "YH-5G" \

wifi.hidden yes \

wifi-sec.key-mgmt wpa-psk \

wifi-sec.psk "12345678"

3-然后启动连接:

nmcli connection up YH-5G

4-然后设置双网同时在线(有线优先):

nmcli connection modify "Wired connection 1" ipv4.route-metric 50

nmcli connection modify "LYH-5G" ipv4.route-metric 100

5-最后重启网络:

systemctl restart NetworkManager

6-验证是否成功:

ip addr

eth0 有 IP(UP)wlan0 有 IP(UP)则成功。

7-创建开机自启脚本并赋予权限(直接复制执行)

cat > /usr/local/bin/dual-net-auto.sh << 'EOF'

#!/bin/bash

sleep 3

# 启动有线

nmcli connection up "Wired connection 1"

# 启动隐藏WiFi

nmcli connection up "YH-5G"

# 设置路由优先级(有线优先)

nmcli connection modify "Wired connection 1" ipv4.route-metric 50

nmcli connection modify "YH-5G" ipv4.route-metric 100

EOF

# 赋予执行权限

chmod +x /usr/local/bin/dual-net-auto.sh

8-创建系统服务(开机自动运行):

cat > /etc/systemd/system/dual-net.service << 'EOF'

[Unit]

Description=Auto start LAN + WLAN on boot

After=NetworkManager.service


[Service]

Type=simple

ExecStart=/usr/local/bin/dual-net-auto.sh


[Install]

WantedBy=multi-user.target

EOF

9-启用开机自启(最后一步):

systemctl daemon-reload

systemctl enable dual-net

systemctl start dual-net

10-重启验证是否成功

reboot

2022年8月31日星期三

Ubuntu升级或安装Nginx最新稳定版(官方源安装)

卸载旧版本:

#卸载软件
sudo apt purge nginx   

#自动清理一些程序   
sudo apt autoremove nginx      

 #删除不需要的配置文件

sudo apt autoclean
dpkg -l |grep ^rc|awk ‘{print $2}’ |sudo xargs dpkg -P nginx     

#更新本地缓存文件及系统

sudo apt update && sudo apt upgrade && sudo apt dist-upgrade      

需要添加Nginx官方源才能下载Nginx的最新稳定版本

添加nginx_signing.key:
获取nginx_signing.key文件,
sudo wget http://nginx.org/keys/nginx_signing.key

sudo wget https://mirrors.nju.edu.cn/nginx/keys/nginx_signing.key
添加,
sudo apt-key add nginx_signing.key
删除nginx_signing.key,
rm -f nginx_signing.key

在 /etc/apt/sources.list.d 文件夹中新建nginx.list文件写入下面对应的两行:
jammy 为操作系统版本代号,要根据系统来选择 , 详见
查看操作系统版本命令:
lsb_release -c
官方源:
Ubuntu:
deb https://nginx.org/packages/ubuntu/ jammy nginx
deb-src https://nginx.org/packages/ubuntu/ jammy nginx

debian:
deb https://nginx.org/packages/debian/ bullseye nginx
deb-src https://nginx.org/packages/debian/ bullseye nginx

国内源:
Ubuntu22.04:
deb https://mirrors.nju.edu.cn/nginx/ubuntu/ jammy nginx
deb-src https://mirrors.nju.edu.cn/nginx/ubuntu/ nginx
debian11:
deb https://mirrors.nju.edu.cn/nginx/debian/ bullseye nginx
deb-src https://mirrors.nju.edu.cn/nginx/debian/ bullseye nginx
或debian12:
deb https://mirrors.nju.edu.cn/nginx/debian/ bookworm nginx
deb-src https://mirrors.nju.edu.cn/nginx/debian/ bookworm nginx

最后输入以下命令进行安装:
sudo apt update
如有以下报错,
W: https://nginx.org/packages/ubuntu/dists/jammy/InRelease: Key is stored in legacy trusted.gpg keyring (/etc/apt/trusted.gpg), see the DEPRECATION section in apt-key(8) for details.

执行以下命令后再次更新源:
sudo cp /etc/apt/trusted.gpg /etc/apt/trusted.gpg.d

开始安装 nginx
sudo apt install nginx

输入nginx -v查看安装版本:

新版nginx的/etc/nginx/下的目录结构:

/etc/nginx
├── conf.d
│ ├── default.conf
├── fastcgi_params
├── mime.types
├── modules -> /usr/lib/nginx/modules
├── nginx.conf
├── scgi_params
└── uwsgi_params

主要配置文件存放于/etc/nginx/conf.d 目录

重新加载配置并重启

nginx -t #测试配置语法
nginx -s reload #重新加载配置
sudo systemctl restart nginx #重启Nginx

nginx.pid” failed 修复:

/usr/sbin/nginx -c /etc/nginx/nginx.conf

安装PHP支持,Nginx不具有处理PHP文件的内置支持。将使用PHP-FPM(“ fastCGI进程管理器”)来处理PHP文件。

sudo apt install php-fpm

安装完成后,FPM服务将自动启动。要检查服务状态,请运行

systemctl start php7.4-fpm
systemctl status php7.4-fpm
systemctl start php8.1-fpm
systemctl status php8.1-fpm

或使用/etc/init.d 启动:
{start|stop|status|restart|reload|force-reload}
/etc/init.d/php8.1-fpm start
/etc/init.d/php8.1-fpm restart

默认静态配置

server {
listen 80;
server_name localhost;
location / {
root /var/www/html/;
index index.html index.htm;
}
error_page 500 502 503 504 /50x.html;
location = /50x.html {
root /var/www/html/;
}
}

默认PHP配置

server {
listen 80;
server_name localhost;
# 启用HTTPS
# listen 2443 ssl;
# ssl_protocols TLSv1.3;
# ssl_certificate /etc/ssl/zs/fullchain.crt;
# ssl_certificate_key /etc/ssl/zs/private.pem;
location / {
root /var/www/html/;
index index.php index.html index.htm;
try_files $uri $uri/ /index.php?$args;
}
error_page 404 /404.html;
location = /404.html {
root /var/www/html;
}
error_page 500 502 503 504 /50x.html;
location = /50x.html {
root /var/www/html/;
}
location ~ \.php$ {
fastcgi_pass unix:/run/php/php8.1-fpm.sock;
fastcgi_index index.php;
fastcgi_param SCRIPT_FILENAME /var/www/html$fastcgi_script_name;
include fastcgi_params;
}
location ~ /\.ht {
deny all;
}
}

TCP/UDP端口转发:
/etc/nginx/nginx.conf文件末尾添加配置代码:

stream {
include /etc/nginx/conf.d/*.stream;
}

conf.d目录下,添加*.stream后缀的配置文件,server

#TCP示例:
server {
listen 90;
listen [::]:90;
proxy_connect_timeout 5s;
proxy_timeout 20s;
proxy_pass localhost:89;
}

#UDP示例:
server {
listen 90 udp reuseport;
listen [::]:90 udp reuseport;
proxy_timeout 20s;
proxy_pass localhost:89;
}

-

2022年4月25日星期一

Frp内网穿透使用

Frp 一个简单、高效的内网穿透工具

Frps/frpc客户端管理命令
# 更新配置
systemctl daemon-reload
# 开机启动
systemctl enable frpc.service
systemctl enable frpc-2.service
# 停止服务
systemctl stop frpc.service
systemctl stop frpc-2.service
# 启动服务
systemctl start frpc.service
systemctl start frpc-2.service
# 查看状态
systemctl status frpc.service
systemctl status frpc-2.service
# 重启服务
systemctl restart frpc.service
systemctl restart frpc-2.service
#删除启动项
systemctl disable frpc.service
systemctl disable frpc-2.service

#安装Frps服务端
程序路径/usr/local/app/frps
# 开机启动
systemctl enable frps.service
# 启动服务
systemctl start frps.service
# 查看状态
systemctl status frps.service
# 重启服务
systemctl restart frps.service
#删除启动项
systemctl disable frps.service


官方网站:https://gofrp.org
官方发布地址:https://github.com/fatedier/frp/releases

开始使用!

编写配置文件,先在服务器端文件目录通过 ./frps -c ./frps.ini 启动服务端,再通过客户端文件目录 ./frpc -c ./frpc.ini 启动客户端。如果需要在后台长期运行,建议结合其他工具使用,例如 systemd 和 supervisor。

配置校验
通过执行 frpc verify -c ./frpc.ini 或 frps verify -c ./frps.ini 可以对配置文件中的参数进行预先校验。
frpc: the configuration file ./frpc.ini syntax is ok
如果出现此结果,则说明新的配置文件没有错误,否则会输出具体的错误信息。

自定义二级域名

在多人同时使用一个 frps 时,通过自定义二级域名的方式来使用会更加方便。

通过在 frps 的配置文件中配置 subdomain_host,就可以启用该特性。之后在 frpc 的 http、https 类型的代理中可以不配置 custom_domains,而是配置一个 subdomain 参数。

只需要将 *.{subdomain_host} 解析到 frps 所在服务器。之后用户可以通过 subdomain 自行指定自己的 web 服务所需要使用的二级域名,通过 {subdomain}.{subdomain_host} 来访问自己的 web 服务。

# frps.ini
[common]
subdomain_host = frps.com
将泛域名 *.frps.com 解析到 frps 所在服务器的 IP 地址。

# frpc.ini
[web]
type = http
local_port = 80
subdomain = test
frps 和 frpc 都启动成功后,通过 test.frps.com 就可以访问到内网的 web 服务。

注:如果 frps 配置了 subdomain_host,则 custom_domains 中不能是属于 subdomain_host 的子域名或者泛域名。
同一个 HTTP 或 HTTPS 类型的代理中 custom_domains 和 subdomain 可以同时配置。

frpc配置实现转发多个http站点

frps.ini正常配置(包括加vhost_http_port或者没有加vhost_http_port),
frpc.ini多加几个[web]项,
将新加的[web]项type改为tcp,后面不用加域名或者ip。
frpc会直接将其当作tcp数据包处理,只处理到了传输层(tcp),而没有到应用层(http)。


2022年3月4日星期五

来此加密Let’s Encrypt 免费的SSL泛域(通配符)证书


来此加密Let’s Encrypt 提供免费的SSL证书申请,一次最长申请期限为三个月,可设置到期前提醒,到期自动续订。

注册地址:https://letsencrypt.osfipin.com/user-0408/user/register

注册后支持绑定微信快速登陆。

证书文件说明:

fullchain.crt: 证书和证书链(crt,用于服务器端,请妥善保存)      
private.pem: 私有密钥(key,用于服务器端,请妥善保存)

certificate.pfx: pfx格式证书(使用pfx导入密码完成导入)         适用于IIS 主机

certificate.crt: 证书
chain.crt: 证书链
chain_old.crt: 低版本系统证书链
public.pem: 公钥

2021年8月10日星期二

Linux常用服务运行管理命令

常用服务运行管理命令

systemctl daemon-reload                     更新配置
systemctl list-units --type=service       查看所有已启动服务状态

Apache2运行管理

sudo apachectl configtest #测试语法#
systemctl reload apache2 #重启#
systemctl status apache2 #查看状态#
a2ensite default-ssl.conf  #开启default-ssl.conf配置文件#
a2disconf default-ssl.conf #关闭default-ssl.conf配置文件#

Nginx的运行管理

nginx -t                               #检查语法#
nginx -s reload                    #重新加载配置并重启#
重启服务:
systemctl restart nginx #重启服务#或
/etc/init.d/nginx restart #重启服务#
systemctl status nginx #查看状态#

nginx.pid” failed 修复:
/usr/sbin/nginx -c /etc/nginx/nginx.conf

frpc

sudo systemctl enable frpc #开机启动#
sudo systemctl start frpc #启动#
systemctl status frpc #查看状态#
systemctl stop frpc  #停止
systemctl restart frpc #重启#
systemctl disable frpc #禁止开机启动#
frps
sudo systemctl enable frps #开机启动#
sudo systemctl start frps #启动#
systemctl status frps #查看状态#
systemctl stop frps  #停止
systemctl restart frps #重启#
systemctl disable frps #禁止开机启动#
godns
sudo systemctl enable godns #开机启动#
sudo systemctl start godns #启动#
systemctl status godns #查看状态#
systemctl stop godns  #停止
systemctl restart godns #重启#
systemctl disable godns #禁止开机启动#

快捷路径建立:

mkdir /usr/local/app
mkdir /usr/local/app/config
ln -s /etc/systemd/system /usr/local/app/config/systemd
ln -s /etc/samba /usr/local/app/config/samba
ln -s /etc/nginx /usr/local/app/config/nginx
ln -s /etc/apache2 /usr/local/app/config/apache2
ln -s /usr/local/app/config /root
ln -s /usr/local/app /root/config
ln -s /usr/lib/systemd/system/nginx.service    /etc/systemd/system/nginx.service
ln -s /lib/systemd/system/rc-local.service    /etc/systemd/system/rc-local.service