2020年2月27日星期四

Ubuntu/Debian安装qbittorrent-nox bt

更新源并安装qbittorrent-nox
sudo apt-get update && sudo apt-get install qbittorrent-nox -y

设置开机启动
创建开机启动服务脚本
sudo apt-get install vim -y && vim /etc/systemd/system/qbittorrent-nox.service

写入以下内容:

[Unit]
Description=qBittorrent-nox
After=network.target
[Service]
User=root
Type=forking
RemainAfterExit=yes
ExecStart=/usr/bin/qbittorrent-nox -d
[Install]
WantedBy=multi-user.target

Ubuntu
安装add-apt-repository命令
sudo apt-get update && sudo apt-get install software-properties-common -y

添加qbittorrent-nox的PPA软件源
# qBittorrent 稳定版
sudo add-apt-repository ppa:qbittorrent-team/qbittorrent-stable
# qBittorrent 测试版
sudo add-apt-repository ppa:qbittorrent-team/qbittorrent-unstable

安装qbittorrent-nox
sudo apt-get update && sudo apt-get install qbittorrent-nox -y

设置开机启动
创建开机启动服务脚本:
sudo apt-get install vim -y && vim /etc/systemd/system/qbittorrent-nox.service

写入以下内容:

[Unit]
Description=qBittorrent-nox
After=network.target
[Service]
User=root
Type=forking
RemainAfterExit=yes
ExecStart=/usr/bin/qbittorrent-nox -d
[Install]
WantedBy=multi-user.target

相关命令:
# 修改qbittorrent-nox.service文件后重新载入
sudo systemctl daemon-reload
#启动
sudo systemctl start qbittorrent-nox
#停止
sudo systemctl stop qbittorrent-nox
重启
systemctl restart qbittorrent-nox
#设置开机启动
sudo systemctl enable qbittorrent-nox
#查看状态
sudo systemctl status qbittorrent-nox

默认账号:admin 密码:adminadmin
默认登陆网址:ip:8080

忘记登陆密码时打开/user/.config/qBittorrent/qBittorrent.conf文件,删除“WebUI\Password_PBKDF2”这一行保存,重启qbittorrent-nox后即重置为默认密码。

2020年2月23日星期日

OpenWrt路由系统如何让二级路由下面的设备用上ipv6公网?

完整解决方法如下:


1、确保二级路由器可以正常上网,然后安装如下软件:
opkg update
opkg install odhcp6c odhcpd

2、在启动项目/etc/rc.local文件里添加:

sleep 60
/etc/init.d/odhcpd restart
exit 0

3、配置中继的WAN6接口协议为DHCPv6客户端,


“请求指定长度的 IPv6 前缀”的值改成56(可选项 "自动")。

4、修改/etc/config/dhcp文件,在config dhcp 'wan'这句的上方添加如下配置:

无线中继的话,照此修改:

config dhcp 'vwan6'
        option interface 'vwan6'
        option ra 'relay'
        option dhcpv6 'relay'
        option ndp 'relay'
        option master '1'


保存,退出。

有线中继的话,照此修改:

config dhcp 'wan6'
        option interface 'wan'
        option ra 'relay'
        option dhcpv6 'relay'
        option ndp 'relay'
        option master '1'


保存,退出。

完整配置参考:


config dnsmasq
 option domainneeded '1'
 option localise_queries '1'
 option rebind_protection '1'
 option rebind_localhost '1'
 option local '/lan/'
 option domain 'lan'
 option expandhosts '1'
 option readethers '1'
 option leasefile '/tmp/dhcp.leases'
 option resolvfile '/tmp/resolv.conf.auto'
 option nonwildcard '1'
 option localservice '1'

config dhcp 'lan'
 option interface 'lan'
 option start '100'
 option limit '150'
 option leasetime '12h'
 option ra_slaac '1'

 list ra_flags 'managed-config'
 list ra_flags 'other-config'
 option ra 'relay'
 option dhcpv6 'relay'
 option ndp 'relay'
config dhcp 'wan'
 option interface 'wan'
 option ignore '1'

config dhcp 'wan6'
 option interface 'wan'
 option dhcpv6 'relay'
 option ra 'relay'
 option ndp 'relay'
 option master '1'

config odhcpd 'odhcpd'
 option maindhcp '0'
 option leasefile '/tmp/hosts/odhcpd'
 option leasetrigger '/usr/sbin/odhcpd-update'
 option loglevel '4'

config srvhost
 option srv '_vlmcs._tcp'
 option target 'OpenWrt'
 option port '1688'
 option class '0'
 option weight '100'

5、修改lan接口的dhcp服务的ipv6配置。
 ra,dhcpv6,ndp这3项都改为中继模式。


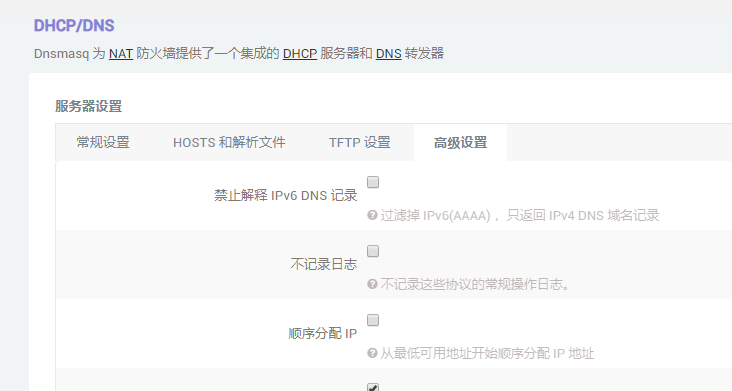
6.DHCP/DNS设置中取消禁止解释 IPv6 DNS 记录。

7、重启路由后,二级路由即可正常中继一级路由器的IPV6,有线和无线都可以中继IPV6了。

2020年2月8日星期六

NextCloud 更新下载失败的解决方法


NextCloud使用更新器自动更新时,到下载压缩包阶段,如果不通过代理,国内直接下载是非常慢的,使用更新器自动更新的时候,经常到了Downloading下载阶段会报错。
遇到这情况怎么办呢?
解决方法很简单,手动把新压缩包下载下来,放到指定目录,修改状态文件的值,使更新器认为当前节点已完成,继续后续步骤即可。
主路径:/data/updater-随机代码/
手动将更新文件zip上传到/downloads目录
修改.step文件,将{"state":"start","step":5},修改成{"state":"end","step":5}
重新刷新Updater页面,会发现上方按钮变成Continue Update,然后继续更新过程。

2020年2月7日星期五

2020年2月1日星期六

电信光猫获取超级管理员密码

     传统设置页面默认地址:
http://192.168.1.1:8080/login.html

    获取管理员密码,解决23端口被关闭方法,适用于中兴F412/F460/F612/F660等
    开个dos窗口一直ping,用如下命令
    ping 192.168.1.1 -l 128 -t
    再开一个dos窗口(10128为端口号)
    telnet 192.168.1.1 10128
    账号:root
    密码:Zte521(福建密码telecomadmin,四川密码Zte521@SC)
    sendcmd 1 DB p DevAuthInfo 获取管理员密码 用于网页登录

    输入:sendcmd 1 DB p VoIPSIPServer回车就可以查看SIP的相关配置
    输入:sendcmd 1 DB p VoIPSIPLine回车就可以查看用户注册名,鉴权用户名和密码

2019年12月31日星期二

Ubuntu18.04 及更高版本Ubuntu 配置Ip地址、网关、DNS

一、查看各项信息,IP、网关、DNS

1. 查看IP:

ifconfig

2. 查看网关

netstat -rn 或 route -n

3. 查看DNS

cat /etc/resolv.conf

3. 查看DNS解析 ,nslookup  [host]

示例:
nslookup www.baidu.com

结果如下:
root@localhost:~# nslookup www.baidu.com
Server:         192.168.0.1
Address:        192.168.0.1#53

二、配置IP、网关、DNS

Ubuntu 20.04

首先修改 /etc/systemd/resolved.conf 文件,在其中添加dns信息,例如:
DNS=8.8.8.8 114.114.114.114

然后退出保存。
然后以root身份在ubuntu终端中依次执行如下命令:
重启systemd-resolved服务
systemctl restart systemd-resolved

设置开机启动
systemctl enable systemd-resolved
 
重命名原有配置文件
mv /etc/resolv.conf  /etc/resolv.conf.bak

创建配置文件的软连接
ln -s /run/systemd/resolve/resolv.conf /etc/

再查看/etc/resolv.conf文件就可以看到新的dns信息已经写入其中了。
cat /etc/resolv.conf

Ubuntu18.04

1. 使用ifupdown配置网络

1)如果要使用之前的方式配置网络,需要重新安装ifupdown:

sudo apt install ifupdown

2)修改配置文件/etc/network/interfaces:

配置文件修改如下:

iface ens160 inet static
address 210.72.92.25
gateway 210.72.92.254
netmask 255.255.255.0
dns-nameservers 8.8.8.8

3)重启网络服务使配置生效

sudo services network restrart

4)修改DNS

打开/etc/resolv.conf
sudo vim /etc/resolv.conf

重启服务生效:
sudo /etc/init.d/resolvconf restart #使DNS生效

2. 使用netplan配置网络(推荐)

1) 配置IP及网关

Ubuntu 18.04使用netplan配置网络,其配置文件是yaml格式的。安装好Ubuntu 18.04之后,在/etc/netplan/目录下默认的配置文件名是50-cloud-init.yaml,我们通过VIM修改它:
sudo vim /etc/netplan/50-cloud-init.yaml
配置文件修改如下:
参考配置:配置eth0为外网网卡,eth1为内网网卡
# /etc/netplan/50-cloud-init.yaml

network:
renderer: networkd
ethernets:
eth0:
addresses: [192.168.100.211/23, 'fe80:0:0:0:0:0:c0a8:64d3']
gateway4: 192.168.100.1
nameservers:
addresses: [8.8.8.8, 8.8.4.4]
search: []
optional: true
eth1:
dhcp4: false
addresses: [192.168.100.10/24]
routes:
- to: 0.0.0.0/0
via: 192.168.100.1
metric: 50
optional: true
eno4:
dhcp4: true
optional: true
version: 2

典型配置2,双网卡自动获取IP
# /etc/netplan/50-cloud-init.yaml

network:
renderer: networkd
ethernets:
eth1:
dhcp4: true
dhcp6: true
optional: true
eth0:
dhcp4: true
dhcp6: true
optional: true
version: 2


这里把DNS和ipv4地址配置在一个文件里了,不用再修改/etc/resolv.conf 文件。
重启网络服务使配置生效
sudo netplan apply

查看网络信息
ip addr list

2019年12月27日星期五

Apache2反向代理配置示例

 配置文件:Proxy.conf


<VirtualHost *:555>

     ServerName cn.cn

     SSLEngine on

     SSLProxyEngine on

     #反向代理设置

     AllowEncodedSlashes NoDecode

        ProxyPass /  http://localhost:5212/

        ProxyPassReverse /  http://localhost:5212/


SSLCertificateFile /etc/apache2/ssl/2_cn.cn.crt

   SSLCertificateKeyFile /etc/apache2/ssl/3_cn.cn.key


     <Directory />

                 Options Indexes FollowSymLinks MultiViews

                 AllowOverride all

                 Order deny,allow

                 Allow from all

     </Directory>

 </VirtualHost>


 <VirtualHost *:444>

     ServerName s.cn.cn

     SSLEngine on

     SSLProxyEngine on

     #反向代理设置

     AllowEncodedSlashes NoDecode

        ProxyPass /  http://localhost:5212/

        ProxyPassReverse /  http://localhost:5212/


SSLCertificateFile /etc/apache2/ssl/2_s.cn.cn.crt

   SSLCertificateKeyFile /etc/apache2/ssl/3_s.cn.cn.key


     <Directory />

                 Options Indexes FollowSymLinks MultiViews

                 AllowOverride all

                 Order deny,allow

                 Allow from all

     </Directory>

 </VirtualHost>


  <VirtualHost *:666>

     ServerName d.cn.cn

     SSLEngine off

     SSLProxyEngine off

     #反向代理设置

     AllowEncodedSlashes NoDecode

        ProxyPass /  http://localhost:8090/

        ProxyPassReverse /  http://localhost:8090/


SSLCertificateFile /etc/apache2/ssl/2_d.cn.cn.crt

   SSLCertificateKeyFile /etc/apache2/ssl/3_d.cn.cn.key

     <Directory />

                 Options Indexes FollowSymLinks MultiViews

                 AllowOverride all

                 Order deny,allow

                 Allow from all

     </Directory>

 </VirtualHost>


配置文件:ports.conf

# If you just change the port or add more ports here, you will likely also

# have to change the VirtualHost statement in

# /etc/apache2/sites-enabled/000-default.conf


Listen 80

Listen 666


<IfModule ssl_module>

Listen 443

Listen 444

Listen 555

</IfModule>


<IfModule mod_gnutls.c>

Listen 443

</IfModule>


# vim: syntax=apache ts=4 sw=4 sts=4 sr noet